
BIND DNS Server: Difference between revisions
Started article |
m Added images |
||
| Line 17: | Line 17: | ||
# On the terminal type <code>sudo yast</code>. Type your password if prompted. | # On the terminal type <code>sudo yast</code>. Type your password if prompted. | ||
# Arrow down to <code>Network Services</code>. Tab across to the right hand box and select the new option <code>DNS Server</code>. Press Enter. | # Arrow down to <code>Network Services</code>. Tab across to the right hand box and select the new option <code>DNS Server</code>. Press Enter. [[File:DNS1.png|150px|thumbnail|right|Step 2]] | ||
# The first page will add the forwarders (DNS server to look for addresses if not cached or local) and caching policy. | # The first page will add the forwarders (DNS server to look for addresses if not cached or local) and caching policy. [[File:DNS2.png|150px|thumbnail|right|Step 3]] | ||
#* We will leave <code>Local DNS Resolution Policy</code> as <code>Automatic merging</code>. Tab to the next box. | #* We will leave <code>Local DNS Resolution Policy</code> as <code>Automatic merging</code>. Tab to the next box. | ||
#* Make sure that under <code>Local DNS Resolution Server</code>, it is set to <code>This name server (bind)</code>. Tab to the next box. | #* Make sure that under <code>Local DNS Resolution Server</code>, it is set to <code>This name server (bind)</code>. Tab to the next box. | ||
| Line 27: | Line 27: | ||
#* You can add as many DNS servers as you feel necessary for redundancy purposes but need at least one. | #* You can add as many DNS servers as you feel necessary for redundancy purposes but need at least one. | ||
#* Once done, tab to <code>[Next]</code> and press Enter. | #* Once done, tab to <code>[Next]</code> and press Enter. | ||
# Next, we want to set up a DNS zone. You can name this anything you want, but for easier reference in the future, it is best to use your domain name here. | # Next, we want to set up a DNS zone. You can name this anything you want, but for easier reference in the future, it is best to use your domain name here. [[File:DNS3.png|150px|thumbnail|right|Step 4]] | ||
#* Tab to the name box and type your domain name. In our case, <code>freddythechick.uk</code>. We'll leave this as a master record so we'll tab past the <code>Type</code> box to the <code>Add</code> button and press Enter. | #* Tab to the name box and type your domain name. In our case, <code>freddythechick.uk</code>. We'll leave this as a master record so we'll tab past the <code>Type</code> box to the <code>Add</code> button and press Enter. | ||
#* Your new zone should appear underneath in the <code>Configured DNS Zones</code> box. | #* Your new zone should appear underneath in the <code>Configured DNS Zones</code> box. | ||
# We'll want to edit the zone we have just created. Tab to <code>[Edit]</code> and press Enter. | # We'll want to edit the zone we have just created. Tab to <code>[Edit]</code> and press Enter. [[File:DNS4.png|150px|thumbnail|right| Step 5 Part 1]] | ||
#* We'll want to set up the NS Records. Tab along the top until you are on <code>Basics</code>. Arrow across to <code>NS Records</code> | #* We'll want to set up the NS Records. Tab along the top until you are on <code>Basics</code>. Arrow across to <code>NS Records</code> | ||
#* Here we'll add the domain name (in our case, <code>freddythechick.uk</code>). When we add this, there must be a <code>.</code> at the end. Tab to <code>Name Server to Add</code>. Type the domain name (with the <code>.</code> at the end (it becomes <code>freddythechick.uk.</code>. Once done, tab to <code>Add</code> and press Enter. | #* Here we'll add the domain name (in our case, <code>freddythechick.uk</code>). When we add this, there must be a <code>.</code> at the end. Tab to <code>Name Server to Add</code>. Type the domain name (with the <code>.</code> at the end (it becomes <code>freddythechick.uk.</code>. Once done, tab to <code>Add</code> and press Enter. | ||
#* We'll now need to add some records to the DNS server for lookup. Tab along the top to <code>NS Records</code>. Arrow across to <code>Records</code>. | #* We'll now need to add some records to the DNS server for lookup. Tab along the top to <code>NS Records</code>. Arrow across to <code>Records</code>. [[File:DNS5.png|150px|thumbnail|right|Step 5 Part 2]] | ||
#* The first record we'll add is an 'A' record. This points the domain name to the IP address. | #* The first record we'll add is an 'A' record. This points the domain name to the IP address. | ||
#* Tab to <code>Record Key</code>. Type your domain name with the trailing <code>.</code>. Make sure the <code>Type</code> is <code>A: IPv4 Domain Name Translation</code>. Tab to <code>Value</code> and type the servers IP address in. Once done, tab to <code>[Add]</code> and press Enter. It should appear under <code>Configured Resource Records</code> | #* Tab to <code>Record Key</code>. Type your domain name with the trailing <code>.</code>. Make sure the <code>Type</code> is <code>A: IPv4 Domain Name Translation</code>. Tab to <code>Value</code> and type the servers IP address in. Once done, tab to <code>[Add]</code> and press Enter. It should appear under <code>Configured Resource Records</code> | ||
| Line 39: | Line 39: | ||
#* Tab to the <code>Type</code> box. Arrow down and select <code>CNAME: Alias for Domain Name</code>. Shift+Tab to the <code>Record Key</code> box and clear the current value. In this box, simply type <code>@</code> (This automatically fills out the correct value for you. Tab to <code>Value</code> and clear the current value. Type one of the two values (<code>www</code> or <code>thinkserver</code>) in the box. Tab to the <code>[Add]</code> button and press Enter. It should appear under <code>Configured Resource Records</code>. | #* Tab to the <code>Type</code> box. Arrow down and select <code>CNAME: Alias for Domain Name</code>. Shift+Tab to the <code>Record Key</code> box and clear the current value. In this box, simply type <code>@</code> (This automatically fills out the correct value for you. Tab to <code>Value</code> and clear the current value. Type one of the two values (<code>www</code> or <code>thinkserver</code>) in the box. Tab to the <code>[Add]</code> button and press Enter. It should appear under <code>Configured Resource Records</code>. | ||
#* Repeat above to add outstanding CNAME records. Once done, tab to <code>[OK]</code> and press Enter. | #* Repeat above to add outstanding CNAME records. Once done, tab to <code>[OK]</code> and press Enter. | ||
# Once the zone is setup, tab to <code>[Next]</code> and press Enter. | # Once the zone is setup, tab to <code>[Next]</code> and press Enter. | ||
# Last few settings to configure regarding firewall and boot behaviour. | # Last few settings to configure regarding firewall and boot behaviour. [[File:DNS6.png|150px|thumbnail|right|Step 7]] | ||
#* If you have your firewall enabled, tab to <code>[ ] Open Port in Firewall</code> and press Space. You will have to configure it only to your Internal Zone with the <code>[Firewall Details...]</code>. You '''ABSOLUTLEY''' don't want to give it access from the outside unless you have a specific need to, otherwise you open up your server to attack. If your firewall is disabled, the text will be in blue and you will not be able to tab to it. | #* If you have your firewall enabled, tab to <code>[ ] Open Port in Firewall</code> and press Space. You will have to configure it only to your Internal Zone with the <code>[Firewall Details...]</code>. You '''ABSOLUTLEY''' don't want to give it access from the outside unless you have a specific need to, otherwise you open up your server to attack. If your firewall is disabled, the text will be in blue and you will not be able to tab to it. | ||
#* We won't be using LDAP support so we'll skip this option. Tab to <code>Start-up Bhaviour</code> (Behaviour is spelt wrong in the code!). Once on <code>( )On: Start Now and When Booting</code>, press space to enable the option. | #* We won't be using LDAP support so we'll skip this option. Tab to <code>Start-up Bhaviour</code> (Behaviour is spelt wrong in the code!). Once on <code>( )On: Start Now and When Booting</code>, press space to enable the option. | ||
#* Once done, tab to <code>[Finish]</code> and press Enter. YaST will configure your computer and show the progress. | #* Once done, tab to <code>[Finish]</code> and press Enter. YaST will configure your computer and show the progress. | ||
# That's it, you can start pointing computers to the server as a DNS server. | # That's it, you can start pointing computers to the server as a DNS server. | ||
Latest revision as of 02:11, 21 June 2016
Setting up the BIND DNS Server allows you to run a local DNS server. On initial configuration, it will act as a caching DNS server. When used by computers on the local network, it will use a common cache to save constant lookups over the internet (e.g. Computer 1 looks for google.com. The local DNS server will not have it in cache at first and will ask a DNS server on the internet for the address. The address will then be forwarded to the computer that requested it and cached in case it is needed in the near future. Computer 2 then wants to goto google.com as well. Instead of looking for it over the internet again, it will already be cached locally and can be sent straight to the computer). We are also using a local DNS server to resolve our new domain name locally. Locally it will point to the local IP address, externally, it will point to the external IP address, otherwise we would have to look up a local resource externally over the internet which is inefficient. It also allows us to use a HTTPS certificate both locally and externally without any problems.
Along with dynamic DHCP, it allows us to resolve any local host on the network, no matter what IP it happens to have. This means when a device gets a new local IP address with DHCP, DHCP will update its DNS link to the new address and the device can still be resolved. Setting up the DHCP server will also make all the local computer's look to the local DNS server.
Installation
We need 2 packages installed to complete this task:
- bind
- yast2-dns-server
This will also suggest some other dependencies which can be accepted.
Configuring for first use
On the first run, YaST will run through the settings in setup mode. Once setup, you will not be able to access setup mode again and will have to use the expert mode thereon after. Make sure settings are right the first time round to save disappointment later!!!
- On the terminal type
sudo yast. Type your password if prompted. - Arrow down to
Network Services. Tab across to the right hand box and select the new optionDNS Server. Press Enter.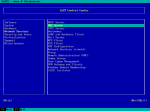
Step 2 - The first page will add the forwarders (DNS server to look for addresses if not cached or local) and caching policy.
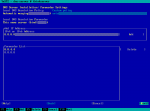
Step 3 - We will leave
Local DNS Resolution PolicyasAutomatic merging. Tab to the next box. - Make sure that under
Local DNS Resolution Server, it is set toThis name server (bind). Tab to the next box. - We need to add some forwarders to look up uncached internet address. Some examples are:
- 8.8.4.4 and 8.8.8.8 to use Google DNS servers (selected)
- 194.168.4.100 194.168.8.100 to use Virgin Media DNS servers
- Type each one seperatly into the box then tab to
[Add]and press Enter. Shift+Tab to move back to the address box and add another address. - You can add as many DNS servers as you feel necessary for redundancy purposes but need at least one.
- Once done, tab to
[Next]and press Enter.
- We will leave
- Next, we want to set up a DNS zone. You can name this anything you want, but for easier reference in the future, it is best to use your domain name here.
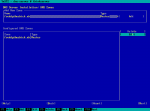
Step 4 - Tab to the name box and type your domain name. In our case,
freddythechick.uk. We'll leave this as a master record so we'll tab past theTypebox to theAddbutton and press Enter. - Your new zone should appear underneath in the
Configured DNS Zonesbox.
- Tab to the name box and type your domain name. In our case,
- We'll want to edit the zone we have just created. Tab to
[Edit]and press Enter.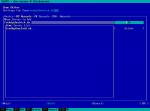
Step 5 Part 1 - We'll want to set up the NS Records. Tab along the top until you are on
Basics. Arrow across toNS Records - Here we'll add the domain name (in our case,
freddythechick.uk). When we add this, there must be a.at the end. Tab toName Server to Add. Type the domain name (with the.at the end (it becomesfreddythechick.uk.. Once done, tab toAddand press Enter. - We'll now need to add some records to the DNS server for lookup. Tab along the top to
NS Records. Arrow across toRecords.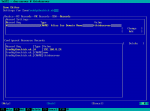
Step 5 Part 2 - The first record we'll add is an 'A' record. This points the domain name to the IP address.
- Tab to
Record Key. Type your domain name with the trailing.. Make sure theTypeisA: IPv4 Domain Name Translation. Tab toValueand type the servers IP address in. Once done, tab to[Add]and press Enter. It should appear underConfigured Resource Records - At this point, we can add 'CNAME' records which point to this server from different typed names. For example, if we add www CNAME record, www.freddythechick.uk will point to the same A record. In this case we'll add one for www (for web access) and one for thinkserver (the host name).
- Tab to the
Typebox. Arrow down and selectCNAME: Alias for Domain Name. Shift+Tab to theRecord Keybox and clear the current value. In this box, simply type@(This automatically fills out the correct value for you. Tab toValueand clear the current value. Type one of the two values (wwworthinkserver) in the box. Tab to the[Add]button and press Enter. It should appear underConfigured Resource Records. - Repeat above to add outstanding CNAME records. Once done, tab to
[OK]and press Enter.
- We'll want to set up the NS Records. Tab along the top until you are on
- Once the zone is setup, tab to
[Next]and press Enter. - Last few settings to configure regarding firewall and boot behaviour.
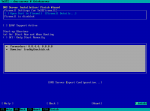
Step 7 - If you have your firewall enabled, tab to
[ ] Open Port in Firewalland press Space. You will have to configure it only to your Internal Zone with the[Firewall Details...]. You ABSOLUTLEY don't want to give it access from the outside unless you have a specific need to, otherwise you open up your server to attack. If your firewall is disabled, the text will be in blue and you will not be able to tab to it. - We won't be using LDAP support so we'll skip this option. Tab to
Start-up Bhaviour(Behaviour is spelt wrong in the code!). Once on( )On: Start Now and When Booting, press space to enable the option. - Once done, tab to
[Finish]and press Enter. YaST will configure your computer and show the progress.
- If you have your firewall enabled, tab to
- That's it, you can start pointing computers to the server as a DNS server.


